
Lab Guide: Dify on ECS
Objective
In this lab, you will:
- Create a Virtual Private Cloud (VPC) and configure a VSwitch
- Create an Alibaba Cloud ECS instance
- Deploy Dify on the ECS instance using Docker Compose
- Build a simple Chatbot with Retrieval-Augmented Generation (RAG) application using the Qwen models.
Prerequisites
- An Alibaba Cloud account
1 Create a VPC and VSwitch
1.1 Access the VPC Console
- Log in to the Alibaba Cloud Console (https://home.console.alibabacloud.com/)
- Navigate to Products and Services > Virtual Private Cloud (VPC)
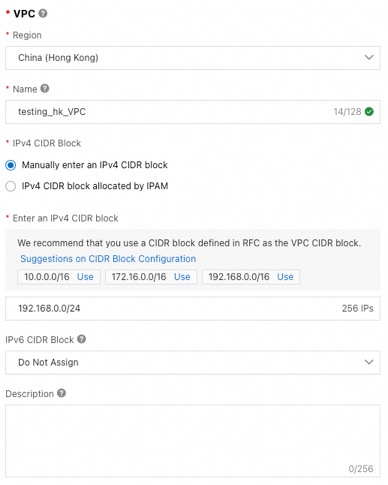
1.2 Create a VPC
- Click “VPC” on the left-side navigation pane
- Click “Create VPC” in the top-left corner
- Select “China (Hong Kong)” inb Region
- Enter “{your_name}_hk_vpc” in Name
- Enter “192.168.0.0/24” in Enter and IPv4 CIDR block
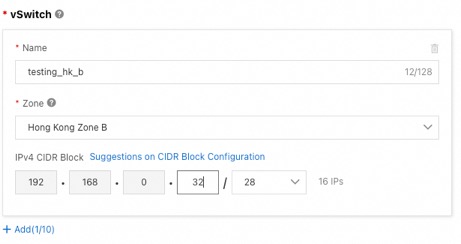
1.3 Create a VSwitch
- Enter “{your_name}_hk_b” in Name
- Select “Hong Kong Zone B”
- Enter “192.168.0.32/28”
- Click “OK”
2 Create an ECS
2.1 Create a Key Pairs
- Go to Products and Services, select Elastic Compute Service (ECS)
- Click “Key Pairs” on the left-side navigation pane
- Click “Create SSH Key Pair”
- Enter “{your_name}_key” in Name
- Click “OK”
- A “{your_name}_key.pem” file will be automatically downloaded in your laptop

2.2 Launch an ECS Instance
- Go to Products and Services, select Elastic Compute Service (ECS)
- Click Create ECS Instance
- Select “Pay-as-you-go” in Billing Method
- Select “China (Hong Kong)” in Region
- Select “{your_name}_hk_vpc” & “{your_name}_hk_b” in Network adn Zone
- Select “ecs.u1-c1m2.xlarge” in Instance
- Click oon “Show Other Images”
- Select “Ubuntu” & “Ubuntu 22.04 64-bit” in Image
- Enter “40” in System Disk Size
- Tick “Assign Public IPv4 Address” in Public IP Address
- Select “Pay-by-traffic” in Bandwidth Billing Method
- Select “1” in Maximum Bandwidth
- Select “New Security Group”
- Tick HTTP (TCP:80)
- Select “Key Pair” in Logon Credential
- Select “root” in Logon Username
- Select “{your_name}_key” in Key Pair
- Expand Advanced Setting (Optional)
- Enter “{your_name}_hk_ecs” in Instance Name
- Click “Create Order”
- Click “Subscribe”
2.3 Get the ECS Public IP
- Click “Instances” on the left-side navigation pane
- Click on your selected instance ID
- Look for Public IP Address under Instance Details > Configuration Information
- Copy the Public IP Address for later usage
3 Connect to the ECS Instance
3.1 Remote Connection to ECS Instance
- Go to Products and Services, select Elastic Compute Service (ECS)
- Select “Instances” on the left-side navigation pane
- Click Connect in the Actions column
- In the Remote connection dialog box, click Sign in now in the Workbench section
- Select “SSH Key Authentication” in the Authentication field
- Upload the {your_name}_key.pem file downloaded in Step 2.1.16
- Click “Log On”
3.2 Update the Server
- Update and upgrade
apt update && apt upgrade -y4 Install Dependencies on the Server
4.1 Install Docker
- Install Docker
apt install -y docker.io- Start and enable
systemctl start docker
systemctl enable docker- Verify
docker --version4.2 Install Docker Compose
- Download
curl -L "https://github.com/docker/compose/releases/latest/download/docker-compose-$(uname -s)-$(uname -m)" -o /usr/local/bin/docker-compose- Make executable
chmod +x /usr/local/bin/docker-compose- Verify
docker-compose --version4.3 Install Git
- Install Git
apt install -y git5 Deploy Dify on the Server
5.1 Clone the Dify Repository
- Clone
git clone https://github.com/langgenius/dify.git- Navigate
cd dify/docker5.2 Start Dify
- Copy the environment file
cp .env.example .env- Launch
docker-compose up -d- Check Status
docker psThe services should be up as below

5.3 Access Dify Console
- Open a browser and visit http://<PUBLIC_IP_ADDRESS> (e.g., http://47.123.45.67)
- The Dify web interface should appear. If not, wait a minute and refresh
6 Use Case – Chatbot with RAG
6.1 Register a New Account
- Enter your email address
- Enter your username
- Enter your password
- Click “Set Up”

6.2 Login to Dify
- Enter your username
- Enter your password
- Click “Sign In”
6.3 Get API Key from Model Studio
- Log in to the Alibaba Cloud Console (https://home.console.alibabacloud.com/?spm=a3c0i.7911826.6791778070.31.2e6419a1K8njJA)
- Navigate to Products and Services > Alibaba Cloud Model Studio
- Click User Icon on the top right corner
- Click “API-KEY”
- Click “Create My API Key”
- Select “Default Workspace”
- Click “OK”
- Click “View” under Actions
- Copy the API Key under API KEY
6.4 Model Integration Settings (LLM Model)
- Click on your username
- Click “Settings”
- Click “Model Provider”
- Search “OpenAI-API-compatible”
- Click “Install”
- Click “Add Model”
- Select “LLM” under Model Type
- Enter “qwen-max” under Model Name
- Enter “qwen-max” under Model Display Name
- Enter the API Key copied from Step 3.3.9
- Enter “https://dashscope-intl.aliyuncs.com/compatible-mode/v1” under API endpoint URL
- Enter “qwen-max” under model name for API endpoint
- Click “Save”
6.5 Model Integration Settings (Embedding Model)
- Click “Add Model”
- Select “Text Embedding” under Model Type
- Enter “text-embedding-v3” under Model Name
- Enter “text-embedding-v3” under Model Display Name
- Enter the API Key copied from Step 3.3.9
- Enter “https://dashscope-intl.aliyuncs.com/compatible-mode/v1” under API endpoint URL
- Enter “text-embedding-v3” under model name for API endpoint
- Click “Save”
6.6 Prepare a PDF Document
- On your local computer, download the PDF file (https://www.ia.org.hk/en/legislative_framework/files/GL2_Eng.pdf)
6.7 Create a Knowledge Base
- Go to “Knowledge” in Dify Console
- Click “Create Knowledge”
- Drag or upload the PDF file downloaded in Step 6.6.1
- Click “Next”
- Click “Preview Chunk”
- Make sure “text-embedding-v3” is selected Embedding Model
- Click “Save & Process”
6.8 Create a Chatbot with the Knowledge Base
- Go to “Studio” in Dify Console
- Click “Chatbot”
- Click “Create from Blank”
- Enter “{your_name}_chatbot” under App Name & Icon
- Click “Create”
Click “Add” in Knowledge box- Add a Knowledge box and connect between Start and Model.
- Select the Knowledge Base created in Step 6.7
- Select “qwen-max”
- Use the Debug & Preview conversation box to ask questions